Multiecuscan help & guides
Multiecuscan PDF User Guide (English)
Multiecuscan Multiplexed package installation and activation guide
Multiecuscan MS package installation and activation guide
Multiecuscan for iPad/iPhone/MacBook installation and activation guide
You can find more information and ask for help on our forum - Multiecuscan Forum
Multiecucan installation
Multiecuscan is a Microsoft .NET application. It requires Microsoft .NET Framework to be installed on your computer in order to use it.
The Microsoft .NET Framework is available for free and can be downloaded from www.microsoft.com.
The .NET Framework is most probably already installed on your computer.
For Windows XP/Vista/7/8/8.1 it is required to install Microsoft .NET Framework 2.0 SP2.
For Windows 10 it is required to install Microsoft .NET Framework 3.5 (from Turn Windows Features on or off).
For Windows 11 there should be no need to install .NET Framework as it is required to have the latest version and it is installed with Windows 11 by default.
In order to install Multiecuscan on your computer you need to download the installation program from our web site.
Then you simply need to run the installation file and follow the instructions on screen.
You can download the installation for Windows XP/Vista/7/8/8.1/10 from here
You can download the installation for Windows 11 from here
Multiecucan license activation
In order to use the full functionality of Multiecuscan you need to purchase a license.
The license comes in the form of License Key which you have to enter in the Registration window of Multiecuscan.
First you have to download and install Multiecuscan. Then you have to start the program and open the Registration window.
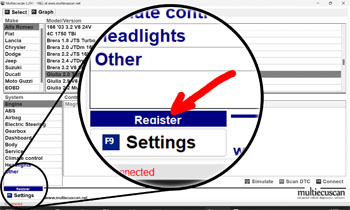
In order to open the Registration windows you have to click on the blue Register button as shown on the screenshot below.
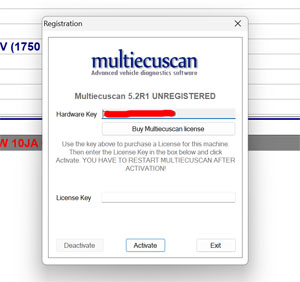
Click on the "Buy Multiecuscan license" button and it should open the license purchase page on our web site.
Alternatively, you can copy the "Hardware Key" and then go to license puurchase page,
then enter your email address and Hardware Key. Please note that it is not required to do the actual purchase on the same computer where Multiecuscan is installed -
you can do it on your phone (the payment processor supports Apple Pay and Google Pay) or another computer.
NOTE: If you have PROMO CODE from one of our distributors or Multiecuscan MS package
then go to our promo code license activation page
Enter Name, email address, promo code, Hardware Key and press Get License.
NOTE: If you have Multiecuscan MULTIPLEXED package
then go to our multiplexed activation page
Enter Name, email address, cantiecar serial number and press Get License.
After that you will receive an email with the Multiecuscan license. Copy the License Key from the email and paste it in Multiecuscan register window.
Then press Activate button. Multiecuscan will restart and the message in top bar will be "Multiecuscan x.x REGISTERED" or "Multiecuscan x.x MULTIPLEXED".
OBD interface
In order to use Multiecuscan software you need to have an OBD device which
connects your computer to the OBD port of the vehicle.
The following OBD interfaces are currently supported by the software:
KL (also known as VagCom 409), ELM327 (1.3 or newer), OBDKey 1.40, OBDLink, ELM Scan 5, CANtieCAR, Vgate vLinker.
Please note that the Bluetooth OBDKey, ELM 327 and OBDLink interfaces are fully supported but not recommended for special functions (like PROXI Alignment, remote control programming, IMA coding, etc.) as they often fail to perform these advanced tasks!
CANtieCAR is a professional multi-protocol interface with multiplexing capabilities.
Vgate vLinker MS/Multiecuscan is a special multiplexed interface that can connect to newer CAN-only vehicles without the need of additional adapter cables. It is the only supported Bluetooth interface that can reliably perform PROXI alignment and other special procedures.
For the USB interfaces you may need to install drivers for Windows on the first connection to the USB port of the computer. Windows 10/11 has its own drivers for most interfaces and they usually work correct, but sometimes requires manual installation.
There are different types of interfaces which have different drivers, but most of the interfaces use either
https://ftdichip.com/drivers/vcp-drivers/ or
https://www.silabs.com/software-and-tools/usb-to-uart-bridge-vcp-drivers?tab=downloads.
So, you can try with these drivers as well.
Please note that "latency" and "buffers" in Windows' Device Manager should only be changed for KKL interfaces! For ALL other types of interface these should NOT be changed! Many sources on internet recommend to change these values, but it is not correct.
For the Bluetooth interfaces - you have to pair the device with Windows before using it with Multiecuscan. The procedure for pairing is: First plug the Bluetooth OBD device into car's OBD port (because it has to be powered),
then, in Windows, right-click on the Bluetooth icen on bottom right and select Add a Bluetooth Device, then find the device in the list of discovered Bluetooth devices and try to pair it.
Windows will ask for a 4-digit pin code which is usually one of the following (for most Bluetooth adapters):
1234, 0000, 1111, 6789, 5678
Some of the newer Bluetooth devices will show a pre-filled pin code and ask you to confirm it.
Bluetooth LE interfaces - Multiecuscan on Windows 11 also supports Bluetooth Low Energy (BLE) devices which work without pairing to Windows. Currently we support the following BLE devices - Vgate vLinker and CANtieCAR v5.x.
For the BLE devices you just have to plug the device into the car, then open Multiecuscan and try to connect to any module in the car. Multiecuscan will automatically detect the BLE device and use it to connect to the car. The interface configuration in Multiecuscan Setting should be set to Auto-Detect which is set by default.
Multiecuscan main screen
When you start Multiecuscan it will show the following screen
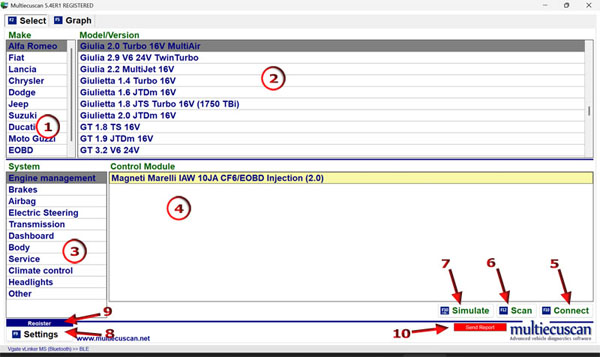
The main screen of Multiecuscan is divided into 4 parts. You can use the TAB
button or the mouse to go from one part to another. You can also use the arrow
keys to go up/down the lists.
1. MAKE - Here you can select the “Make” of your vehicle.
You also have an additional selection option [Recent] where you can see the last
20 vehicle models which you have used. You can clear this list from “Settings”.
2. MODEL/VERSION - Here you can select the model and version of the vehicle.
You can also type letters from keyboard for fast searching through this list. For
example you can type GIU from keyboard and the list will scroll to GIULIA.
3. SYSTEM - Here you have to select the type of system which you want to connect to.
4. CONTROL MODULE - Here Multiecuscan will display the supported control modules for selected vehicle
make, model, version and type of system. You have to select the control module
which you have in your car. If you select an incorrect module and connect to it
then the program will warn you with message “Incorrect ISO code” and will suggest the correct type of module.
You can use the SCAN function to see which modules are available in your car.
5. CONNECT button - Click this button (or press button F10 on your keyboard) to start connection
with the selected module. In order to connect to the module you have to make
sure that:
- The OBD interface drivers are installed properly and the OBD interface is connected to the USB port (for USB interfaces)
- The interface is configured properly in Multiecuscan settings -
we recommend to leave interface configuration as "Auto-Detect"
- The interface is connected to the OBD port of the vehicle
- The correct ccolored interface adapter is connected (if required). Multiecuscan will warn
you if an adapter is required when you click on “Connect” button. If you don’t
want to see a warning message for the required adapter then you can turn it off
from Multiecuscan Settings.
- The power supply of the vehicle is turned ON - key is at position MAR or Start button pressed once
PLEASE NOTE that if the interface type in Multiecuscan Settings is configured as "Auto-Detect"
then the very first connection may take a little longer (up to a minute) as Multiecuscan will first try to identify and configure the OBD adapter.
6. SCAN button - Click this button (or press F12 on your keyboard) to scan your vehicle for
supported control modules and check each module for errors. Multiecuscan will start scanning your vehicle and display the results with discovered control modules and DTCs.
Please note that the system will only discover the modules which can be accessed using the connected colored interface adapter,
however, if you are using the MULTIPLEXED version with CANtieCAR interface then the system will discover all modules in your vehicle.
Also, if you are using vLinker MS device then the system will discover all modules from all CAN busses of the vehicle.
PLEASE NOTE that the SCAN DTC button which was available in the older versions of Multiecuscan has been removed as the SCAN now does the same thing.
You can still run the simple scan without DTCs by pressing F11. Also, if you use the FREE version then Multiecuscan will perform simple SCAN and will not check for DTCs.
7. SIMULATE button - Click this button (or press button CTRL+F10 on your keyboard) to start connection
with the selected module in SIMULATION MODE. The SIMULATION mode lets you explore the functionality of Multiecuscan without
actual connection to a car. You can explore the available parameters, tests and calibrations for the selected control module.
PLEASE NOTE THAT THE DATA IN SIMULATION MODE IS NOT REAL AND IT DOES NOT COME FROM YOUR CAR!!!
8. SETTINGS button - Click this button (or press F9 on your keyboard) to open Multiecuscan settings.
9. REGISTER button - Click this button to open Multiecuscan registration window.
10. SEND REPORT button - Click this button to send Diagnostic Report to Multiecuscan server. The
diagnostic reports help us to find and fix problems in Multiecuscan. The report contains information about your last connection
(the data sent and received from your car). It does not contain any personal information or any information about your computer.
Please note that this button appears after disconnecting from a control module or after a failed connection.
|
|
|